Installation Guide
Note to the installer
■ Beforeattemptingtoconnectoroperatethisproduct,pleasereadthelabelontherearof
themainmonitor.
■
Pleasereadthis
guide
carefully,andinstalltheproductsafelyandcorrectlybyfollowing
theinstructions.Carefullyreadtheinformationfoundinthesectiontitled"Foryoursafety"
inparticular.
■
Onlyuseattachments/accessoriesspecifiedbythemanufacturer.
■
Theinstallationshallbecarriedoutinaccordancewithallapplicableinstallationrules.
■
Panasonicassumesnoresponsibilityforinjuriesorpropertydamageresultingfromfailures
arisingoutofimproperinstallationoroperationinconsistentwiththisguide.Additionally,
anyresultingmalfunctionwillnotbecoveredunderthewarranty.
■ Afterinstallation,makesuretoleavethisguidewiththecustomer.
For the Installation of door station
and main monitor station
•VL-V554isasurfacemounttype,VL-V554Uisaush
mounttype.
•Inthismanual,thesufxofeachmodelnumber(e.g.,
the"FX"in"VL-SWD501FX")isomitted.
For your safety
Topreventsevereinjuryandlossoflife/property,readthissectioncarefullybeforeusingthe
producttoensureproperandsafeoperationofyourproduct.
WARNING
Preventingre,electricshockandshortcircuits
● Leaveinstallationworktothedealer.
Installationworkrequirestechniqueandexperiences.Failuretoobservethismay
causere,electricshock,injury,ordamagetotheproduct.Consultthedealer.
● Electricalconnectionworkshouldbeperformedbycertiedpersonnelonly.Certication
isrequiredforperformingelectricalconnectionwork.Consultyourdealer.
● Useonlythespeciedpowersupplyunit.
● Donotattempttodisassembleormodify thisproduct. Contactanauthorisedservice
centreforrepairs.
● Neverinstallwiringduringalightningstorm.
● Donotconnectnon-specieddevices.
● Donotconnectapowercabletoaterminalthatisnotspeciedinthisguide.
● When opening holes inwallsforinstallation or wiring,or whensecuring the power
cable,makesureyoudonotdamageexistingwiringandductwork.
● Donotmakeanywiringconnectionswhenthepowersupplyisturnedon.
● Donotusethesuppliedpowersupplyunitforoutdoorinstallations(itisforindooruseonly).
● Donotinstallthemainmonitorandpowersupplyunitinthefollowingplaces:
- Placeswherethemainmonitorandpowersupplyunitmaybesplashedwithwateror
chemicals.
- Placeswherethereisahighconcentrationofdust,orhighhumidity.
● Donotperformanyactions(suchasfabricating,twisting,stretching,bundling,forcibly
bending,damaging,altering,exposingtoheatsources,orplacingheavyobjectsonthe
powercable) thatmaydamage thepowercable. Usingthe productwithadamaged
powercablemay cause electricshock, short circuits, orfire. Contactanauthorised
servicecentreforrepairs.
● When existing chime wires are used, it ispossible that they containAC voltage.
Contactanauthorisedservicecentre.
● Donotinstallor use theproductin healthcare facilitiesifany regulationsposted in
the area instruct you not to do so. Hospitals orhealthcare facilities may be using
equipmentthatcouldbesensitivetoexternalRF(radiofrequency)energy.
● Do not install orusethis product nearautomatically controlled devices such as
automatic doorsandfire alarms. Radiowavesemittedfromthis productmay cause
suchdevicestomalfunction,resultinginanaccident.
Preventingaccidentsandinjuries
CAUTION
● Ifthewiringisunderground,donotmakeanyconnectionsunderground.
● Ifthewiringisunderground,useaprotectiontube.
● Ifthewiringisoutdoors,useaprotectiontubeorasurgeprotector.
● Installtheproductsecurelyadhering totheinstructionsin thisguide toprevent itfrom
fallingoffthe wall.Avoidinstallingontolow-strengthwalls,suchasgypsumboard,ALC
(autoclavedlightweightconcrete),concreteblock,orveneer(lessthan18mmthick)walls.
Preventingelectricshock
Preventinginjury
VL-V554/
VL-V554U
VL-MWD501
Doorstation Mainmonitorstation
Doorstationisdescribedas"doorphone"
andMainmonitorstationisdescribedas
"mainmonitor"inthisguide.
ModelNo.
VL-SWD501
VL-SWD501U
Wireless Video Intercom System
Toavoidmalfunctionorcommunicationdisturbances,donotinstallthedoorphoneorthemain
monitorinthefollowinglocations:
- Placeswherevibrationoranyotherkindofimpactoccurs.
- Placeswhereechoingisfrequent.
- Placesnearahighconcentrationofdust,hydrogensulphide,ammonia,sulphur,ornoxious
fumes.
■
For the doorphone
● Ifastronglightisshiningonthedoorphone,thevisitor’sfacemaynotbedistinguishable.Do
notplacethedoorphoneinthefollowinglocations:
- Wheremostofthebackgroundisthesky.
- Wherethebackgroundisawhitewall,anddirectsunlightwillreectoffit.
- Wheredirectsunlightwillshineonthedoorphone.
● Do not place the doorphone in locationswhere echoing occurs, as this will cause the
doorphonetobeepfrequently.
● Dustprotection/waterprotectionisIP54.
Onlywheninstallationworkspeciedinthisguideisproperlyperformedandappropriatewater
protectiontreatmentisperformed.
● Makesuretherearofthedoorphoneisnotsubjecttowater.
● Dependingontheinstallationlocation,condensationmayformonthedoorphone’slenscover.
Thismaycauseimagestobecomeobscured.Condensationwilldissipateasthetemperature
rises.
■
For the main monitor
● Install the main monitor away from electronic appliances such asTVs, radios, personal
computers, airconditioners,boilercontrolpanelswithintercom,homesecurityequipment,
wirelessdevices,ordigitalcordlessphones.
● Donotinstallthemainmonitorinplaceswhereitwillbeaffectedbyextremelyhigh-frequency
radiowaves(nearbroadcasting antennasetc.).This maycausethe displaytoicker oran
interruptingnoisetooccur.
● Leave at least 20 cm of space above, below,and to the left and rightsides of the main
monitor.Donotinstallonawallthatisdeeplyrecessed.
● Donotinstallthemainmonitorinsideawall.
● Besuretoinstallthemainmonitormorethan5mawayfromthedoorphone.
● The product operates in the frequency range of 1.88 GHz to 1.90 GHz, and the RF
transmissionpower is 250 mW (max.).Refertothe "Forbestperformance" section in the
OperatingInstructions.
● Inareas surroundedbyahighelectricaleld,disturbancesmay occurinthemainmonitor’s
imageorsound.
Supplied accessories for installation
■
For the doorphone
(VL-V554only)
Mounting
base×1
(VL-V554Uonly)
Flush
mounting
box
×
1
Screw×4(Usedwhen
installingthedoorphone)
(VL-V554
:4mmx12mm)
(VL-V554U:4mmx25mm)
Nameplate×2
(incl.1spare)
Hexwrench×1
■
For the main monitor
Mounting
bracket×1
Cablebinder×1
■ Powersupplyunitandrelateditems
Powersupply
unit×1
(PartNo.VL-PS240)
Cablebinder×2
Important:
● Youwillneedthefollowingadditionalitemstoinstallandcongurethedoorphone
and the main monitor.
[Locally procured]
- Screws(formountingbase:×2,formountingbracket:×2):
Preparethescrews(
thedrawingontheright)accordingto
thematerial,structure,strengthandotherfactorsofthemounting
areaandthetotalweightofobjectstobemounted.
- Powercables(AC/DCcables),wires(fordoorphoneandotherconnections):
Preparecablesandwiresoftheappropriatespecication.(
"Wiretypeandlength")
Note:
● Theillustrationsinthesuppliedmanual(s)mayvaryslightlyfromtheactualproduct.
4mm
Precautionsforinstallation
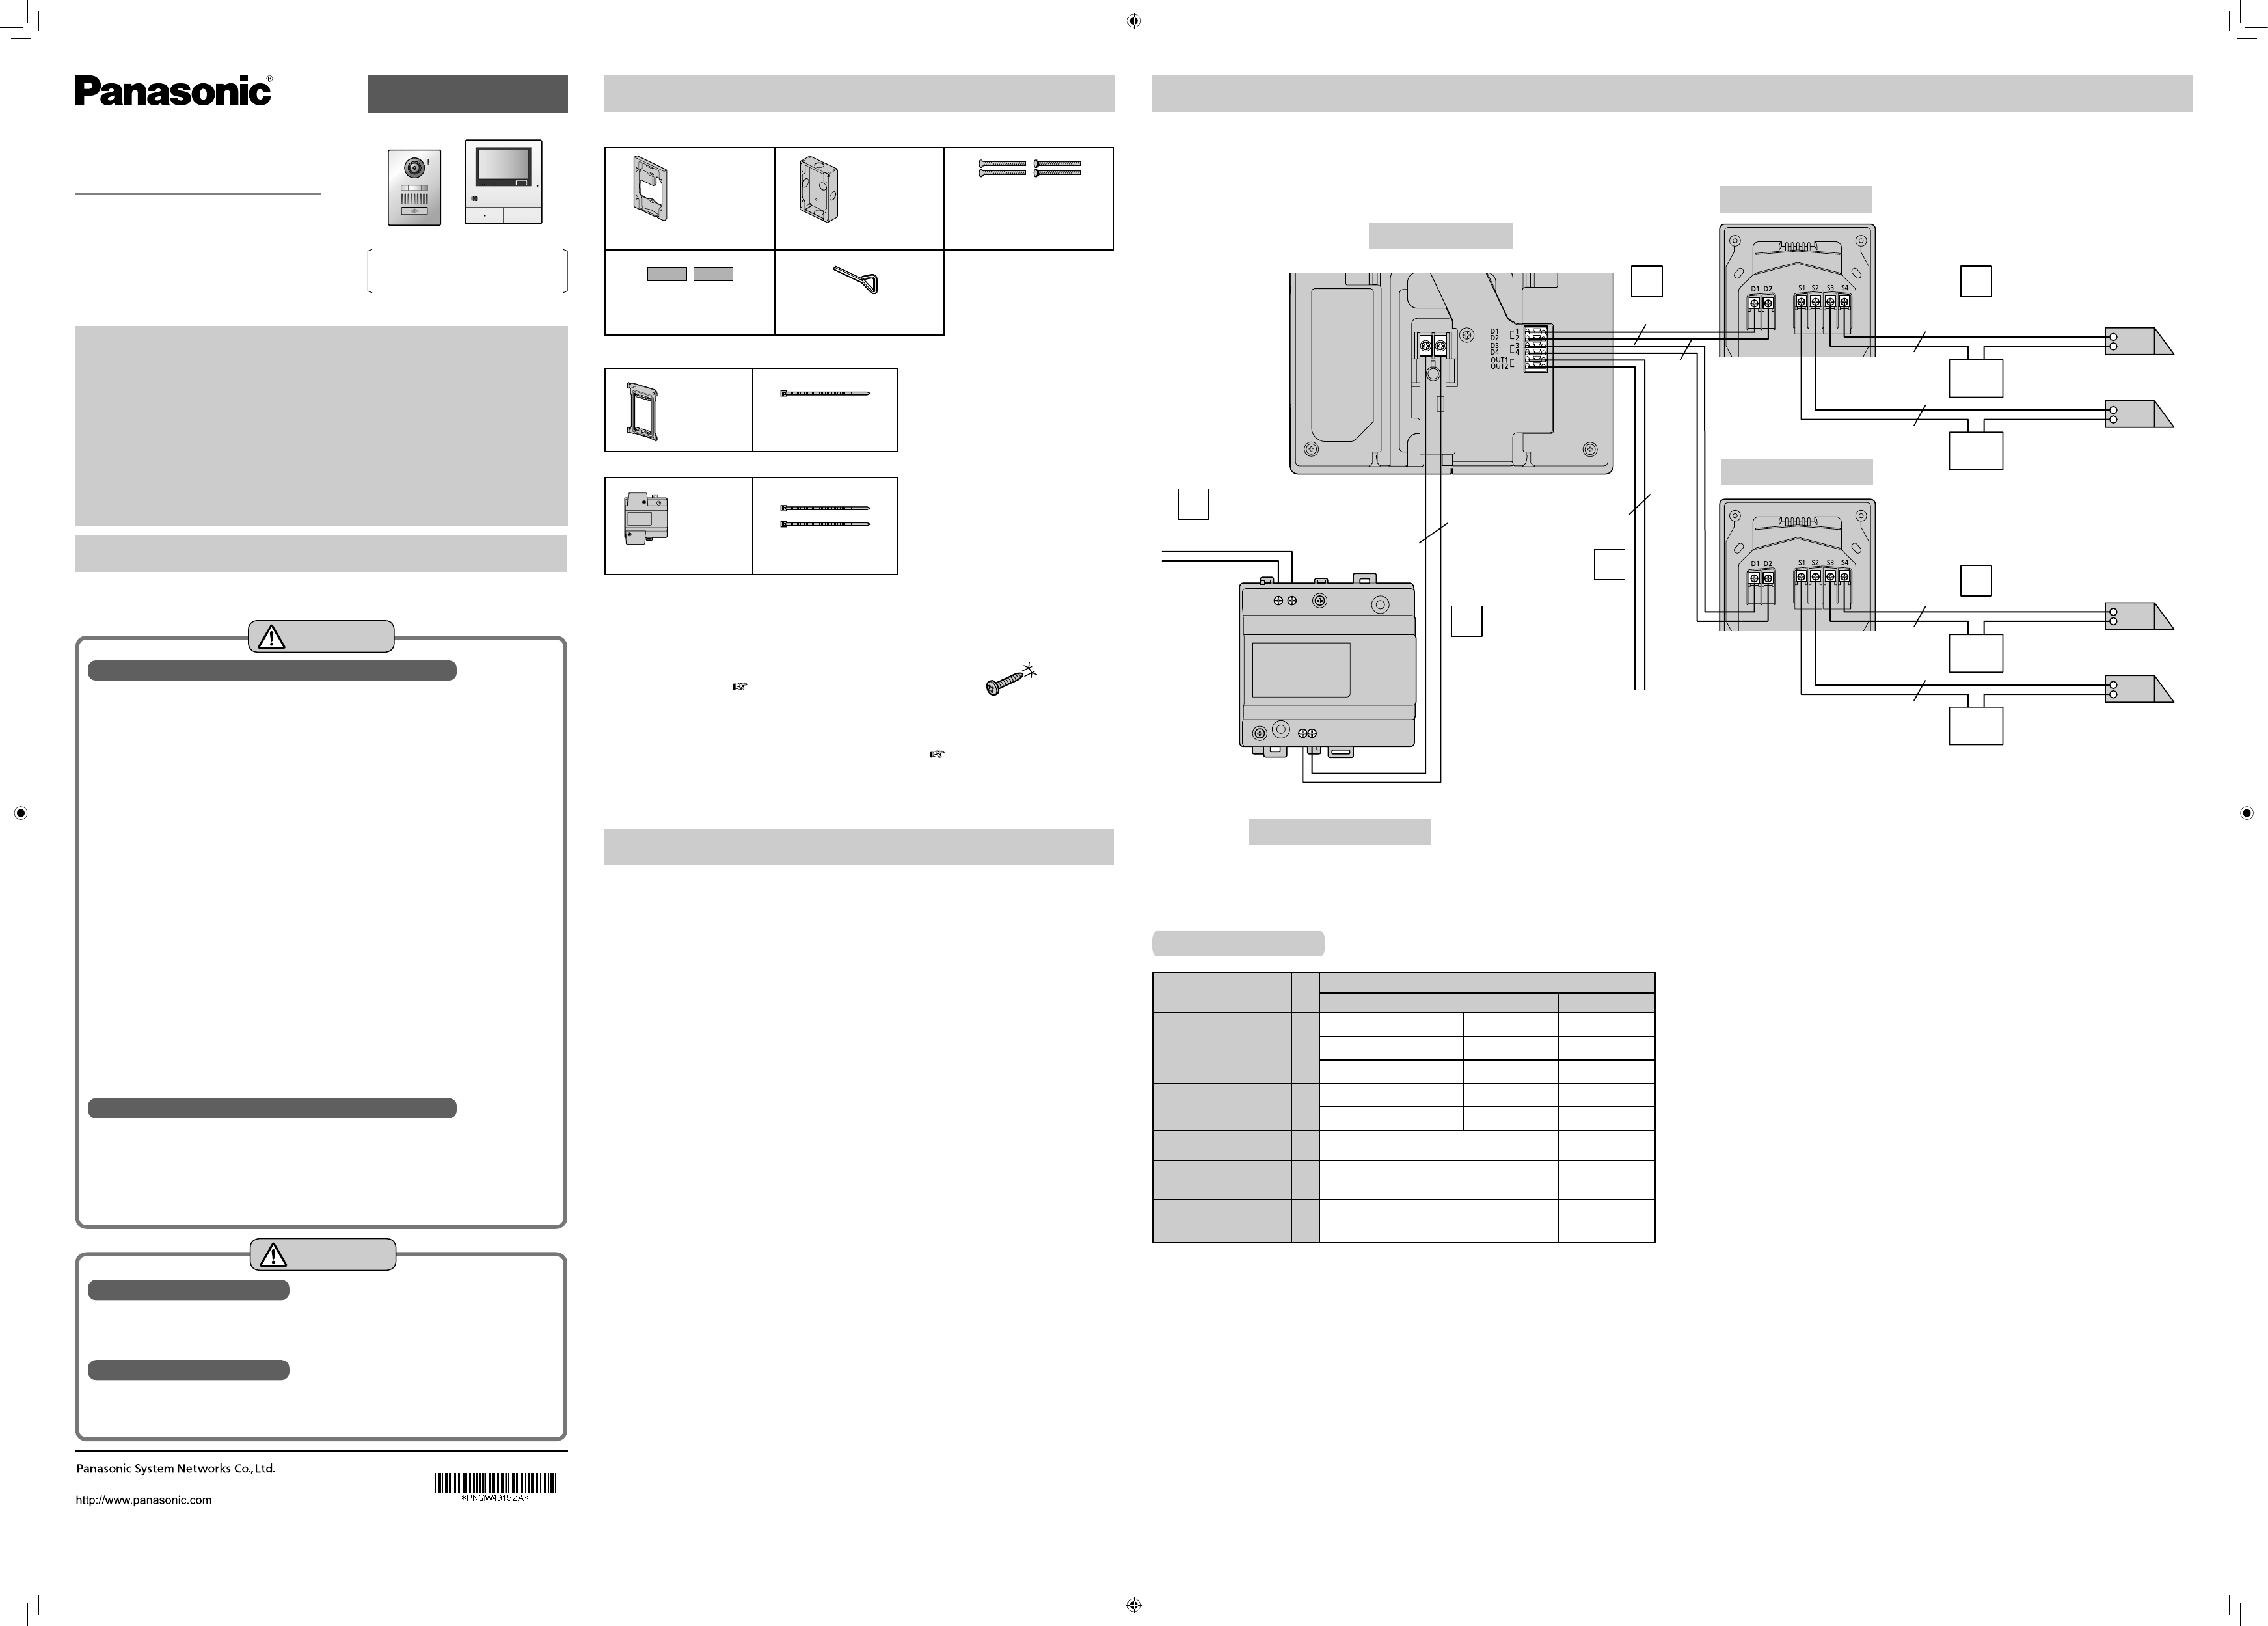
Wiringschematicdiagram
Setupcorrectlyaccordingtothefollowingwiringschematicdiagramand"Wiretypeandlength".
● Forinformation,suchasordernumbers,aboutoptionaldevicesthatcanbeconnectedto,refertothe"Additional/replacementaccessories"sectionintheOperatingInstructions.
ブ
プ
MAIN MONITOR
DOORPHONE1
DOORPHONE2
POWERSUPPLYUNIT
220-240VAC
Connectiondeviceforoptionoutput(Acontact)
*1MakesuretoonlyconnectelectricvehiclegatelockstotheS3/S4terminalsofthe
doorphones.
*2MakesuretoonlyconnectelectricdoorlockstotheS1/S2terminalsofthedoorphones.
NP:Non-polarised
Power
supply
Power
supply
Power
supply
Power
supply
12VAC/DC
12VAC/DC
12VAC/DC
12VAC/DC
Electriclock
(Electricvehicle
gatelock)
*1
Electriclock
(Electricdoor
lock)
*2
Electriclock
(Electricdoor
lock)
*2
Electriclock
(Electricvehicle
gatelock)
*1
24VDC
Wiretypeandlength
Wiringrun
Wiretype
*1
Diameter Length(Max.)
Mainmonitor–
Doorphone
A
φ0.65mm 22AWG 100m
φ1.0mm 18AWG 130m
φ0.5mm CAT5 50m
Mainmonitor–
Powersupplyunit
B
φ0.65mm 22AWG 10m
φ1.0mm 18AWG 20m
Powersupplyunit–
ACpowersource
C
φ1.2mm-φ2.0mm
(17AWG-12AWG)
Norequirement
Doorphone–
Electriclock
*2
D
φ0.5mm-φ1.2mm
(24AWG-17AWG)
Accordingtospeci-
cationofconnected
device.
Mainmonitor–
Connectiondeviceforoption
output(Acontact)
*2
E
φ0.5mm-φ1.2mm
(24AWG-17AWG)
Accordingtospeci-
cationofconnected
device.
*1Type:Single-paircablewithoutersheath(jacket)
Conductor:Coppersolid
● Acertiedpowersupplywiringhastobeusedwiththisequipment.Therelevantnational
installationand/orequipmentregulationsshallbeconsidered.Acertiedpowersupplywiring
notlighterthanordinarypolyvinylchlorideexiblewiringaccordingtoIEC60227shallbeused.
*2Whenusinganelectriclockoraconnectiondeviceforoptionoutput(Acontact),selectadevice
thatmeetsthefollowingguidelines:
● Electriclockconnectionterminal(S1/S2,S3/S4):
- N/Odryclosurecontact
- 12VAC/DC,lessthan1A
● Connectiondeviceforoptionoutput(Acontact)terminal(OUT1/OUT2):
- 24VAC/DC,lessthan0.3A(minimumcontact:5VDC1mA)
A D
D
E
B
C
NP
NP
NP
NP
NP
NP
NP
NP
1-62,4-chome,Minoshima,Hakata-ku,Fukuoka812-8531,Japan
©PanasonicSystemNetworksCo.,Ltd.2015 PNQW4915ZAC1015MM0


 (64 pages)
 (120 pages)
 Manymanuals.com
 Manymanuals.de
 Manymanuals.fr
 Manymanuals.it
 Manymanuals.pl
 Manymanuals.cz
 Manymanuals.es
 Manymanuals-pt.com
Comments to this Manuals