Panasonic KX-PW501DW User Manual
Browse online or download User Manual for Printers Panasonic KX-PW501DW. Panasonic KX-PW501DW User Manual
- Page / 20
- Table of contents
- BOOKMARKS
Rated. / 5. Based on customer reviews
Quick Reference Guide
Facsimile
Model No.
Table of Contents
Finding the controls ……………………………………………………………2
Installations and connections …………………………………………………4
Setting the date and time ………………………………………………………7
Setting your facsimile telephone number ……………………………………7
Setting your logo…………………………………………………………………8
Character input and command key table ……………………………………9
Automatic dialing on the main unit……………………………………………10
Automatic dialing on the portable handset …………………………………12
Intercom between the main unit and portable handset ……………………14
Sending faxes …………………………………………………………………15
Receiving faxes ………………………………………………………………16
Operating the built-in answering device ……………………………………17
Specifications …………………………………………………………………19
Thank you for purchasing a Panasonic facsimile.
●
This guide explains some basic features and operations, but not all of them.
For further details, see the Japanese operating instructions.
●
This product is designed for use in Japan.
Panasonic cannot provide service for this product if used outside Japan.
●
Any details given in this guide are subject to change without notice.
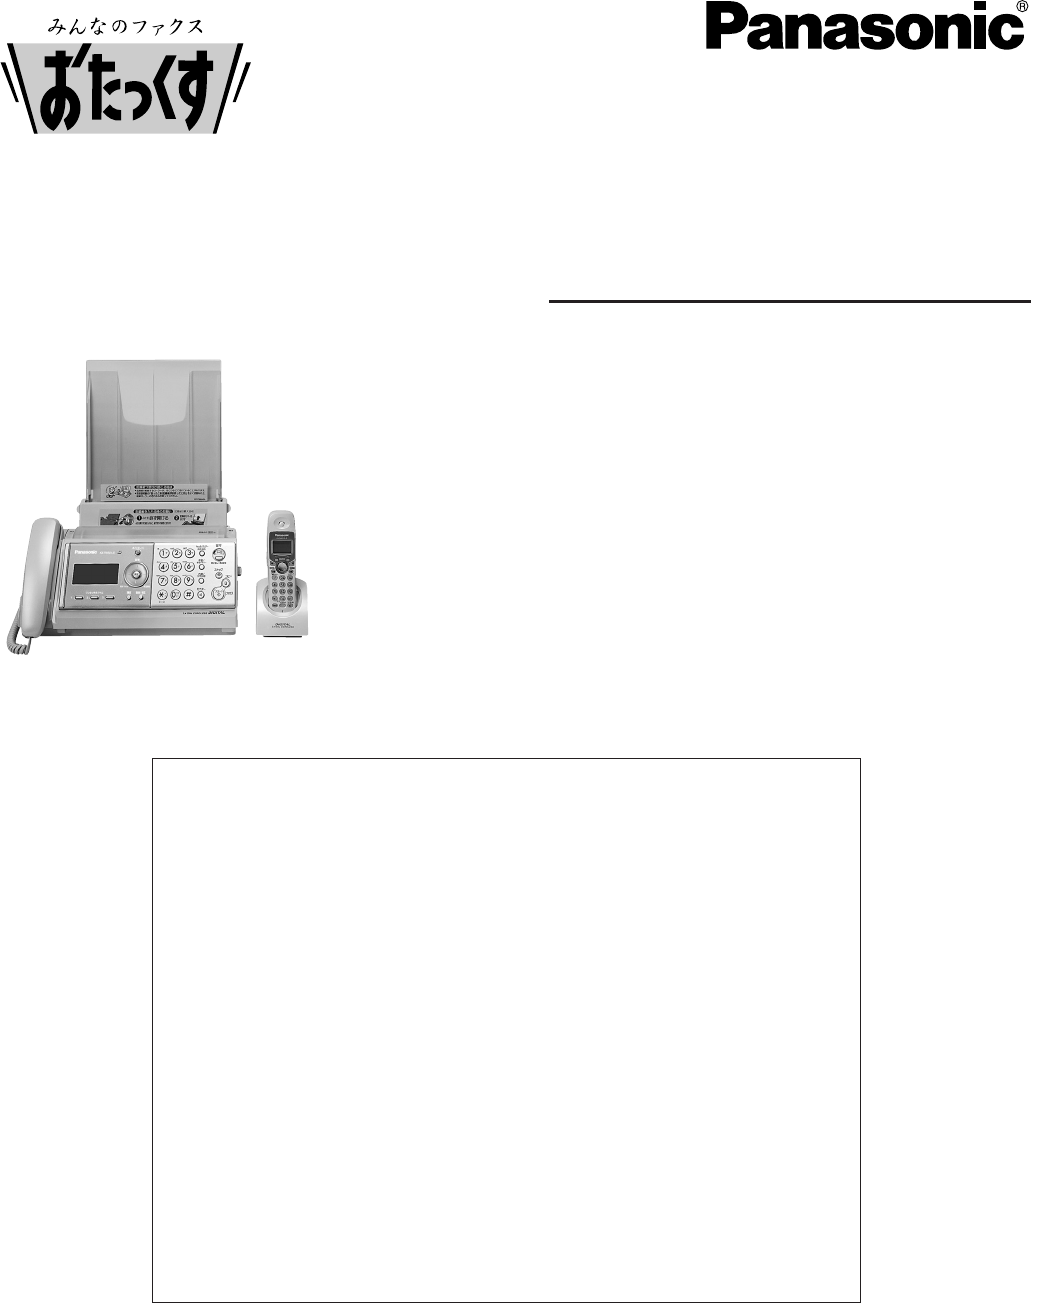
KX-PW501DL
KX-PW501DL
KX-PW501DW
- Quick Reference Guide 1
- Finding the controls 2
- 2 Insert the ink film 4
- Installations and connections 5
- Setting the date and time 7
- Setting your facsimile 7
- 5Press (Stop) 8
- 4Press (Set) 8
- 1Press (Function/Edit) 8
- Portable 9
- トウロクア ハ ア [ケッテイ]オス 11
- ケンサクア ハ ア [ 11
- デンワチョウ アキxxxケン 11
- 0009876543 12
- (Speakerphone) 13
- FACE DOWN 15
- Receiving faxes 16
- Operating the built-in 17
- 1Press (Erase) 18
- 2Press 18
- KX-PW501DL 19
- KX-PW501DW 19
- PFQX2105ZA FK0104GK0 20
Summary of Contents
Page 1 - Quick Reference Guide
Quick Reference GuideFacsimileModel No.Table of Contents Finding the controls ……………………………………………………………2Installations and connections ………………………………………………
Page 2 - Finding the controls
10Automatic dialing on the main unitStoring telephone numbers in theone-touch dialMaking a voice call using theone-touch dial1Press (Function/Edit).3E
Page 3
11Automatic dialing on the main unitStoring names and telephonenumbers in the phonebookMaking a voice call using thephonebook1Press (Phonebook).1Press
Page 4 - 2 Insert the ink film
12Automatic dialing on the portable handset2Press (one-touch).Storing a telephone number inthe one-touch dialMaking a voice call using theone-touch di
Page 5 - Installations and connections
13Storing names and telephonenumbers in the phonebookMaking a voice call using thephonebook1Press (Phonebook).3Enter the name, up to 20 characters (se
Page 6
14Intercom between the main unit and portable handsetAn intercom is available between the main unit and portable handset.A 2-way intercom is available
Page 7 - Setting your facsimile
15Sending faxes 1Open the document cover, and adjust the width of thedocument guides to the size of the document.2Insert the document (up to 5 pages)
Page 8 - 1Press (Function/Edit)
16Receiving faxesReceiving a fax manually (AUTO ANSWER off)2When:– document reception is required, – a fax calling tone (slow beep) is heard, or– no s
Page 9 - Portable
17Receiving faxes2When receiving a call, the unit will receive a faxdocument or record a voice message automaticallydepending on the caller’s request.
Page 10
18Operating the built-in answering device2When receiving a call, a greeting message will beplayed and the unit will record a voice message.●To record
Page 11 - デンワチョウ アキxxxケン
19KX-PW501DLKX-PW501DWMain unitSpecificationsMain unitApplicable line Public Switched Telephone Network (Tone/Pulse), F-Net, NCC Lines320 Ω (*2)G3 com
Page 12 - 0009876543
2Finding the controlsMain unit (control panel)1562437891011121314151617Voice select button adjusts the receivertone quality.Set buttonVolume/Redial/Ph
Page 13 - (Speakerphone)
PFQX2105ZA FK0104GK02004 Panasonic Communications Co., Ltd. All Rights Reserved.C
Page 14
3Finding the controlsPortable handset ● For call waiting service users.● To use the one-touch dial.● To use the speakerphone. LCD (with back light)Ear
Page 15 - FACE DOWN
4Installations and connectionsInstalling the ink film2 Insert the ink film.1 Open the control panel and the back cover.押す ClickClick開くOpen the control
Page 16 - Receiving faxes
5Installations and connectionsInstalling recording paper (A4 size)3 Install the recording paper cover on the recordingpaper tray by sliding it down fr
Page 17 - Operating the built-in
6Connecting the main unitInstallations and connections3 Charge the battery in the charger for 10 hours.PlugChargerAC adaptorPower outlet (AC 100 V)C
Page 18 - 2Press
7Setting the date and time1Press (Function/Edit).2Press .3Enter the correct year/month/day.Example: October 1, 2004Press .3Enter your facsimile teleph
Page 19 - KX-PW501DW
4. Press to move the cursor to the next space and press four times.82Press .3Enter your logo, up to 30 characters, using the dialkeypad.●To enter En
Page 20 - PFQX2105ZA FK0104GK0
9Character input and command key table、、。、。“かな”Hiragana(For the portablehandset only)“英”English“カナ”Katakana“数”Numbers!?/ー#‚ ;: |・’”()[]{}〈〉「」ワヲンー!? (
Related products and manuals for Printers Panasonic KX-PW501DW
Printers Panasonic KX-FM220 User Manual
 (112 pages)
(112 pages)
Printers Panasonic DP-C306 User Manual
(74 pages)
(74 pages)
Printers Panasonic KX-FPC165 User Manual
(112 pages)
(112 pages)
Printers Panasonic DP-C264 User Manual
(4 pages)
(4 pages)
Printers Panasonic DP-2310 User Manual
(80 pages)
(80 pages)
Printers Panasonic SV-P10U User Manual
(28 pages)
(28 pages)
Printers Panasonic KX-FT31BX User Manual
(72 pages)
(72 pages)
Printers Panasonic DP-C405 User Manual
(4 pages)
(4 pages)
Printers Panasonic KX-FPC161 User Manual
(84 pages)
(84 pages)
Printers Panasonic DP-150FX User Manual
(112 pages)
(112 pages)
Printers Panasonic DP-C354 User Manual
(220 pages)
(220 pages)
Printers Panasonic DP-1520P User Manual
(2 pages)
(2 pages)
Printers Panasonic KX-FM106 User Manual
(148 pages)
(148 pages)
Printers Panasonic KX-FL611 User Manual
(86 pages)
(86 pages)
Printers Panasonic KX-MB2060 User Manual
(160 pages)
(160 pages)
Printers Panasonic KX-PW12CL User Manual
(16 pages)
(16 pages)
Printers Panasonic DP-6530 User Manual
(172 pages)
(172 pages)
Printers Panasonic KX-FLB851 User Manual
(110 pages)
(110 pages)
Printers Panasonic AS200 User Manual
(161 pages)
(161 pages)
© 2020, manymanuals.com. All rights reserved. | 6.191 s |
 Manymanuals.com
 Manymanuals.de
 Manymanuals.fr
 Manymanuals.it
 Manymanuals.pl
 Manymanuals.cz
 Manymanuals.es
 Manymanuals-pt.com
Comments to this Manuals